


The safest way to stretch a hat without ruining it
The safest way to stretch a hat is with a dedicated hat stretcher, used alone on polyester or paired with steam on cotton and wool. Moisture only helps natural fibres, so save it for those hats.
Expect modest results. Most methods add about one size, and forms usually need to sit overnight to hold that gain. Here’s what to avoid before you start:
- Cardboard-stiffened brims (moisture turns them soft and warps the shape)
- Coloured felt or cotton that can bleed dye when wet
- Vintage hats with old glues that lift or crack under heat and steam
Key Takeaways
A hat stretcher combined with steam on natural fibres delivers the safest, most reliable size increase, typically about one size after an overnight session.
| Point | Details |
|---|---|
| Match method to material | Use steam plus a stretcher for cotton and wool, and mechanical pressure only for polyester. |
| Stretch in small increments | Turn the stretcher gradually and alternate sides to keep the crown balanced. |
| Measure before and after | Track the sweatband circumference with a tape measure to confirm real progress. |
| Know your stopping point | Stop once the hat measures around one size larger or resistance becomes firm and even. |
| Consider a replacement | Urbancaps stocks stretchers, conditioners, and ready-to-wear hats when a stretch isn’t worth the risk. |
Table of Contents
- Quick pre-checks before you stretch a hat
- How do you stretch a hat step by step?
- Material-by-material stretching guide
- How far can you safely stretch a hat?
- Keeping the new fit: storage and upkeep
- How do you test if your hat’s material can handle stretching?
- Checking your hat sizing during and after stretching
- Knowing when to stop stretching a hat
- When can’t you safely stretch a hat yourself?
- What the DIY hat crowd gets wrong
- Urban Caps has options if stretching isn’t the answer
- Sources
- FAQ
Quick pre-checks before you stretch a hat
Run your fingers over the fabric before you touch a kettle or stretcher. Wool and felt have a soft, dense nap that springs back when pressed. Cotton feels woven and slightly rough. Polyester has a smooth, almost plasticky consistency that barely reacts to touch. Leather is obvious by smell and grain, and straw or sinamay feels stiff, papery, and unforgiving.
- Check the brim material separately from the crown. Many caps use cardboard or plastic stiffening inside the peak, which moisture will ruin.
- Look inside the sweatband for glued seams, labels, or decorative trims. Adhesive-backed elements often lift when steamed.
- Note any beading, sequins, or leather trim. These rarely tolerate moisture well, regardless of the main fabric.
- Gather your tools: a kettle or garment steamer, a spray bottle, a hat stretcher or inflatable form, a towel, and a blow dryer on a low setting.
Once you’ve matched the material to a method, the actual stretching takes far less guesswork than most people expect.
How do you stretch a hat step by step?
Four methods cover almost every hat in your wardrobe. Pick the one that matches the fabric you identified above, not the one that looks easiest.
Steam method (cotton, wool, felt). Boil a kettle or fire up a garment steamer and hold it roughly six inches from the fabric. Pass the steam over the crown two or three times, avoiding the brim if it’s cardboard-backed. Touch the fabric. It should feel warm and slightly damp, not wet through. Insert a stretcher immediately, or put the hat on and wear it while it cools and dries to mould it to your head.
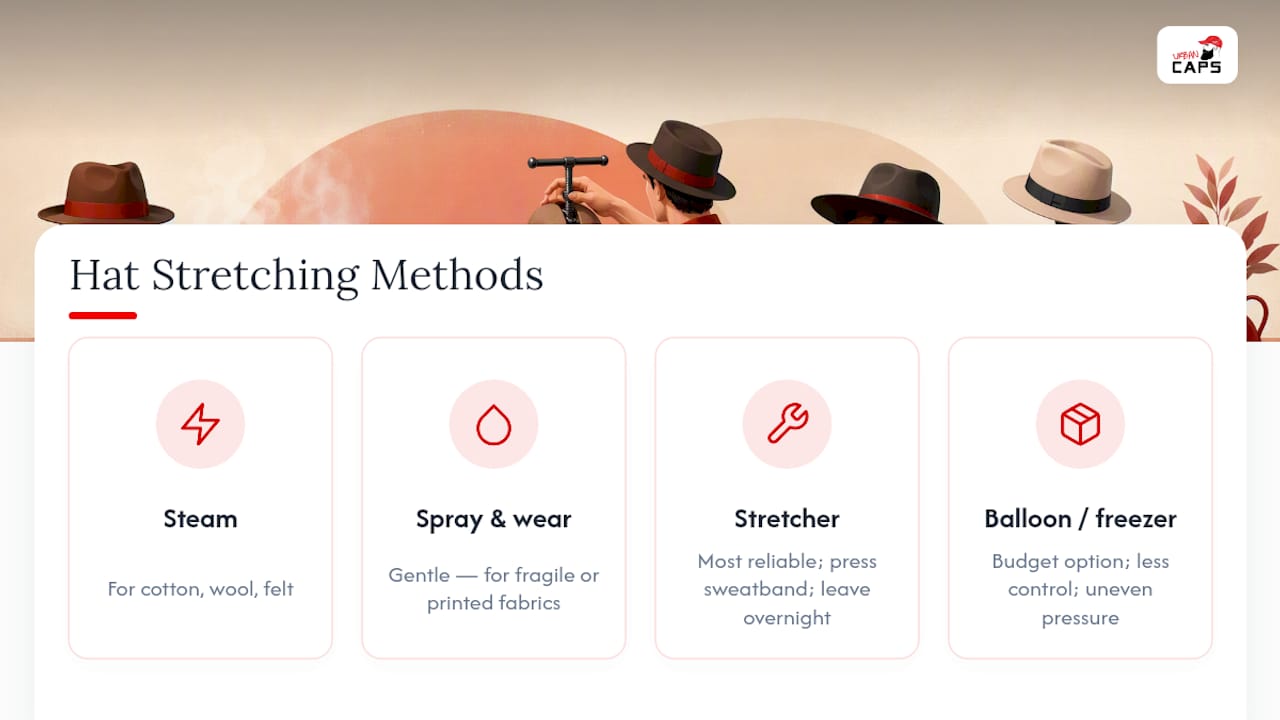
Spray and wear (fragile or delicate hats). Mist the inside of the band lightly with a spray bottle rather than soaking it. Blow-dry on low heat until the dampness is barely there, then wear the hat for twenty to thirty minutes while it finishes drying. This method is gentler than direct steam, so it suits ageing cotton or fabric with printed designs that might not survive heavier moisture.
Hat stretcher method (most reliable for all fabrics). Insert the stretcher so it presses against the sweatband, not up into the crown, since placement against the sweatband is where the pressure belongs and misplacement is the most common cause of crown distortion. Turn the adjustment knob slowly until you feel firm, even resistance rather than a fight. Leave it overnight as a baseline, then check the fit the next morning and turn a little further only if needed.
Balloon, soccer ball, or freezer method (budget alternative). Slip a plastic bag over a balloon or small soccer ball, push it into the hat, and inflate slowly until the crown feels snug. For a freezer version, fill sandwich bags with water, seal them, place them inside the hat, and freeze overnight so the ice expands the shape. Both work in a pinch but offer far less control than a mechanical stretcher, and structured crowns or stiff brims don’t respond well to uneven pressure from a ball.
Pro Tip: Measure the inside of the headband with a soft tape before you start, then measure again after each session. Tracking the actual centimetres stops you from guessing whether the stretch worked or you just imagined it.
Material-by-material stretching guide
Matching the method to the fabric is the difference between a better fit and a hat you can’t wear anymore.
- Cotton responds well to steam and light spraying. Avoid soaking it through, since prolonged dampness encourages dye bleed on printed or dark caps. Pairing steam with an immediate stretcher insertion gives the best, most lasting result.
- Wool and felt need careful steam rather than a soak. Felt should be stretched dry on a stretcher and left overnight, since wet felt loses structure fast. Vintage felt hats are best handed to a professional milliner, because old fibres can shrink back or tear under pressure a newer hat would handle fine.
- Polyester and other synthetics barely react to moisture at all. A stretcher is the only realistic option, so set your expectations accordingly. You’re working with mechanical pressure alone, and the gains will be smaller than on natural fibres.
- Leather needs conditioning first, then light steam or a light dampening, gentle heat from a blow dryer, and a stretcher to finish. Skip high heat and never saturate leather. Valuable pieces are worth professional attention rather than a DIY attempt.
- Straw and sinamay should only have the headband dampened, never the brim. Bending or wetting a straw brim usually cracks the weave. Dry the hat on a form to lock in the new shape.
How far can you safely stretch a hat?
One size is the realistic ceiling for most home methods, and pushing past that is where hats get ruined. Overstretching causes permanent warping, particularly on structured crowns that lose their shape once the fibres are pushed too far.
Three mistakes cause most of the damage people report:
- Placing the stretcher too high so it pushes into the crown instead of the sweatband
- Soaking a cardboard-stiffened brim until it goes soft and never recovers its shape
- Using a hair dryer or steamer on high heat directly against felt or leather
If you notice the brim starting to warp or a visible imprint forming on the crown, stop immediately. Let the hat dry naturally away from direct heat, then reassess. A hat that’s badly misshapen at this point is a job for a hatter, not another round of steam.
Pro Tip: Turn a stretcher in small increments and alternate sides, left, then right, then front, then back, rather than cranking one side wide open. It keeps the crown balanced instead of pulling it lopsided.
Keeping the new fit: storage and upkeep
A hat holds its stretched shape better when you store it properly afterwards.
- Keep the hat on a stretcher or head form between wears rather than on a shelf or in a drawer.
- Never fold or stack hats, since pressure from other items undoes the shape you just worked for.
- Apply leather conditioner to leather hats every few months to stop the material drying out and shrinking back.
- Keep any hat dry after heavy wear in rain or sweat, since dampness followed by drying is exactly what causes shrinkage in the first place.
- Recheck the fit each season. If it’s tightened again, a short stretcher session in small increments usually brings it back without needing a full redo.
Storing a hat on a form between wears does more to preserve a fit long term than any single stretching session.
Where this advice comes from
Urban writes Urbancaps’ hands-on guides, including a full walkthrough on reshaping wool hats at home and practical advice on choosing the right hat style. Urbancaps stocks premium headwear and care accessories with New Zealand stock and fast local delivery. For a deeper, material-specific walkthrough beyond the basics here, the linked guides above go further into technique.
How do you test if your hat’s material can handle stretching?
Test a small, hidden section before committing to a full stretch, ideally somewhere inside the sweatband where a change won’t show.
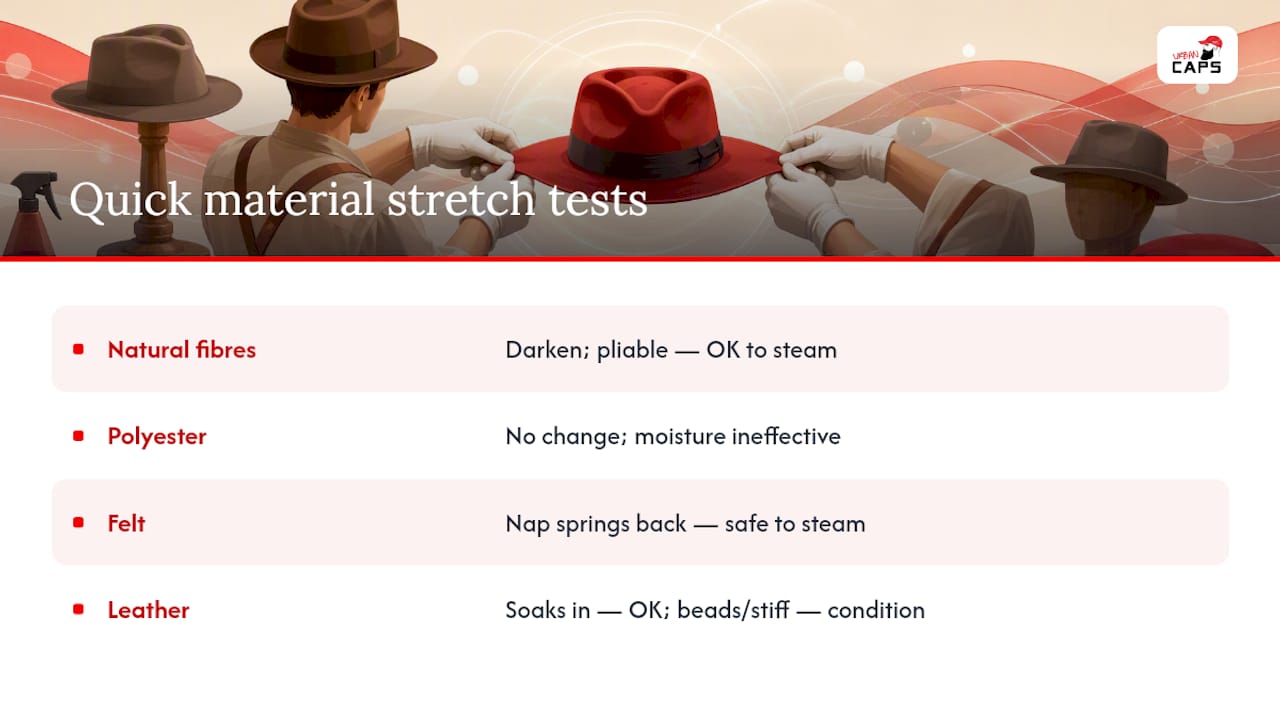
Dab a little water on the inside band with a cloth and watch what happens over a minute. Natural fibres like cotton and wool darken slightly and feel pliable. Polyester stays largely unchanged, confirming that moisture won’t help and a stretcher is your only real option. If colour transfers onto your cloth, you’re looking at a dye-bleed risk and should skip steam or spray methods entirely, sticking to mechanical stretching instead.
For felt, press a fingernail gently into the nap after a light steam test. If the fibres spring back cleanly, the hat can handle a full steam and stretch session. If the felt feels crunchy, thin, or the nap doesn’t recover, treat it as fragile and consider a professional milliner rather than risking it yourself, especially with vintage pieces where the felt has already aged.
Leather deserves its own check. Press a drop of conditioner into an inconspicuous patch and see how it absorbs. Leather that soaks it in evenly is ready for light stretching. Leather that beads the moisture on the surface, or feels stiff and cracked already, needs conditioning treatments over several days before any stretching attempt, and heavily aged or vintage leather is often safer left to a specialist.
This ten-minute check saves you from finding out the hard way that a hat wasn’t a candidate for stretching at all.
Checking your hat sizing during and after stretching
Measuring properly stops you from either giving up too early or overstretching by accident. Wrap a soft tape measure around the inside of the sweatband before you begin, recording the number in centimetres or inches so you have a genuine baseline rather than a guess.
After each stretching session, whether it’s an overnight stretcher hold or a single steam pass, measure again in the same spot. A gain of roughly one to one and a half centimetres in circumference is typical for one size up on most stretchers, though wool and felt sometimes move a touch more than synthetics.
Try the hat on properly rather than trusting the tape measure alone. It should sit comfortably without pinching at the temples or leaving a red line after fifteen minutes of wear, and it shouldn’t slide around or sit high on your head either, which signals you’ve gone too far. A snug hat that eases slightly after a few wears is usually fine. A hat that still pinches after two stretching sessions needs another round rather than force.
If you’re unsure what size band you’re aiming for, a general sizing reference helps you translate centimetre measurements into standard hat sizes before you decide how much further to stretch.
Knowing when to stop stretching a hat
Stop as soon as the hat reaches a comfortable fit, not when you think you might need a bit more room later. The temptation to keep turning the stretcher for extra insurance is exactly how hats end up warped beyond repair.
Watch for these signals that you’ve reached the safe limit:
- The stretcher meets firm, even resistance across the whole band rather than one side giving way easily
- The crown shape starts to look slightly rounder or less structured than it did when you started
- A faint sheen or texture change appears on felt or leather, which usually means the fibres are under more strain than they can take
- The hat measures more than roughly one full size larger than its original circumference
Any one of those is a stopping point, not a target to push past. Come back to it a day or two later once the fibres have settled, rather than trying to force a bigger jump in a single session. Hats you stretch too aggressively in one sitting rarely bounce back to a good shape, even with conditioning or a second round of steam.
When can’t you safely stretch a hat yourself?
Some hats simply aren’t good DIY candidates, and pushing ahead anyway usually costs you the hat entirely.
Watch for cracking or flaking on old leather, a musty smell suggesting the glue or lining has broken down, or a crown that already feels loose and floppy rather than firm. These are signs the materials have degraded past the point where stretching adds value. A vintage felt fedora with brittle fibres, a straw hat with a brim that’s already cracking at the edges, or any hat with visible mould or water staining falls into this category too.
If a hat has reinforced or machine-stitched sweatbands, the stitching itself can cap how far the material will move regardless of technique, and forcing it risks tearing the seam rather than expanding the band. Removing a stiff ribbon sweatband before attempting an aggressive stretch sometimes helps, though that’s a job better suited to someone experienced with hat construction.
Sentimental or genuinely valuable pieces, family heirlooms, designer felt, quality leather, deserve a professional hatter’s attention rather than a home experiment. A hatter has blocking equipment and steam tools calibrated for exact, controlled expansion, and can often achieve a size increase that a stretcher alone can’t manage safely. If you’ve tried steam, spray, and a stretcher without meaningful improvement, that’s your signal the hat has reached its DIY limit.
What the DIY hat crowd gets wrong
Most advice treats stretching like a single universal trick, as if the same steam session that works on a wool trilby should work identically on a polyester trucker cap. It doesn’t, and that mismatch is where most damaged hats come from. The material determines the method, not the other way around, and skipping that first assessment step is the single biggest reason people end up disappointed or worse, with a hat they can’t wear.
The other overlooked point is patience. Plenty of guides promise a same-session fix, but the overnight stretcher hold isn’t a suggestion, it’s the difference between a shape that holds and one that quietly shrinks back within a week. Rushing the process to save an evening usually means repeating it a month later.
What actually matters is sequencing: test the fabric, choose the method that fabric responds to, stretch in small increments, and measure as you go. Skip any of those steps and you’re relying on luck rather than technique. Readers who follow that order get a hat that fits properly for years, not just until the next humid day undoes the guesswork.
— Urban
Urban Caps has options if stretching isn’t the answer
Sometimes a hat has reached its limit, brittle felt, cracked leather, or a stitched sweatband that won’t budge, and buying the right tool or a fresh hat makes more sense than another risky stretching session. Urbancaps stocks hat stretchers, leather conditioners, and storage forms alongside a wide range of ready-to-wear styles, with fast delivery to New Zealand addresses.

If your current hat is beyond a safe fix, a Churchill Heritage Homburg Hat in premium Australian wool felt is a solid like-for-like replacement for a felt hat that’s shrunk past saving. Riders and outdoor workers whose caps have worn thin might look at the Motorcycle UV Cap for something built for daily use from the outset. For flat cap wearers weighing up a full replacement instead of another stretching attempt, the Heritage Herringbone Ivy Cap offers a fresh option in the same category. Browse the full range to compare sizes and styles before you decide whether to stretch or start fresh.
Sources
- Do you need to stretch your hat to get a better fit? - Guy Morse-Brown Hat Blocks
- How to Stretch a Baseball Cap — 5 Proven Methods - Hewore
- How to Stretch a Felt Hat | eHow
FAQ
How do you stretch a hat that is too small?
Use steam on cotton or wool followed by a hat stretcher pressed against the sweatband, or a stretcher alone for polyester, then leave it overnight for the shape to hold.
Can you make a hat size bigger permanently?
Yes, within limits. Most methods add roughly one size safely, and going beyond that risks warping the crown or brim rather than delivering extra room.
How long does it take to stretch out a hat?
Plan for an overnight session as your baseline, with some hats needing a second round a day or two later to reach a comfortable fit.
How do you fix a fitted cap that is too small?
Test the fabric first, then combine steam with immediate stretcher insertion for cotton or wool caps, or rely on the stretcher alone if the cap is polyester.