


Safe Leather Hat Break In for Kiwis Using 30–60 Minute Wear Sessions
Gradual wearing is the safest way to break in a leather hat. Wear it in short sessions, use controlled stretching or light moisture only when the fit still isn’t right, and never soak the leather, blast it with heat, over-condition it, or force the shape by hand.
TL;DR:
- Lambskin and split leather hats typically soften within a week, while full-grain and cowhide varieties may require up to a month to reach a comfortable fit.
- Focusing on the sweatband fit, rather than the crown, is crucial because most shape issues originate at the band, making it the priority in the break-in process.
- Short, daily wear sessions combined with gentle hand shaping during the first two weeks accelerate the fit without risking damage, especially when done around the house.
- Using an adjustable hat stretcher gradually and carefully over several days is safer and more effective for expanding a tight hat than manual stretching or abrupt methods.
- Moisture or brief steaming can help loosen a stiff leather hat, but excessive wetting or heat can cause irreversible damage, so they should be applied with caution in small doses.
Table of Contents
- How do you know your leather hat is breaking in properly?
- What is the best way to wear in a new leather hat?
- Should you use a hat stretcher to fix a tight fit?
- Can misting or steam help soften a stiff leather hat?
- Do leather hats need conditioning, and how often?
- How do you safely shape the brim and crown?
- How do you stop a leather hat from losing its shape after break-in?
- What does Urban Caps recommend for a first-time break-in?
- What matters most when you break in a leather hat?
- Get the right hat and the right care gear from Urban Caps
- Sources
- FAQ
How do you know your leather hat is breaking in properly?
A well-fitting leather hat sits snugly without pinching. Run a finger around the sweatband while wearing the hat. There shouldn’t be any sharp pressure points at the temples or back of the skull, and the brim should hold its curve without flopping or cracking at the crease.
Most people notice the first real change after a few wears, once the leather starts responding to warmth and movement. Major settling tends to happen over a few weeks, though the exact timeline depends on the leather itself.
- Lambskin and split leather soften fastest, often within a week of regular wear.
- Full-grain and heavy cowhide take longer, sometimes a month or more, because the fibres are denser and more resistant to stretching.
- Sweatband contact matters more than crown fit. Fit problems usually start at the sweatband, not the crown, so focus your break-in effort there first.
- Stop and reassess if the hat still feels tight or loose after three weeks of consistent wear. At that point, a hat stretcher, a return, or professional reshaping is a better bet than pushing on with wear alone.
What is the best way to wear in a new leather hat?
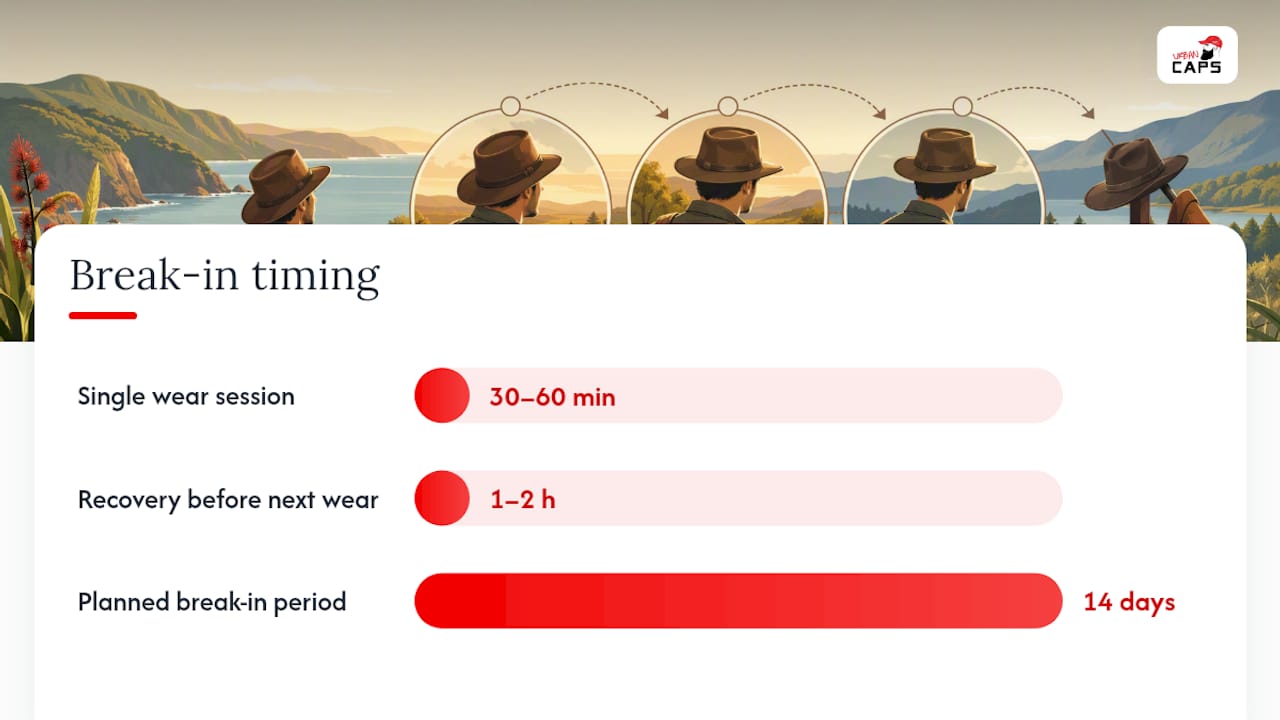
Short, repeated wear cycles do more for a leather hat than one long session ever will. Body heat and gentle motion relax the fibres gradually, and that gradual approach is what protects the shape while still loosening the fit.
Here’s a simple routine to follow in the first fortnight:
- Wear the hat for 30 to 60 minutes at a time, several times a day if you can manage it.
- While the leather is warm from your head, use light hand pressure to gently mould the crown and brim to your preferred shape.
- Do this during everyday activities like a short walk, hanging out washing, or pottering around the house. Movement helps the leather flex naturally in more places than sitting still ever will.
- Check the fit after each session. If you notice pain, a headache, or a deep red line where the band sits, take the hat off and give your head a break before the next cycle.
- Resume once any pressure marks have faded, usually within an hour or two.
Pro Tip: Wear the hat around the house for the first few sessions rather than out in public. You’ll shape it faster because you’re more likely to leave it on through small chores instead of taking it off self-consciously.
Leather rewards this kind of patience. Small, repeated actions build a fit that’s genuinely personalised, rather than a rushed job that leaves the hat looking forced or uneven.
Should you use a hat stretcher to fix a tight fit?
An adjustable hat stretcher is the better tool when wearing alone hasn’t solved the problem after a couple of weeks. Controlled stretching with an adjustable stretcher expands the leather evenly, where manual pulling by hand tends to create uneven bulges or creases that never fully settle.
Here’s how to use one without overdoing it:
- Insert the stretcher and widen it with small, incremental turns. One or two clicks at a time is plenty.
- Leave the hat on the stretcher for several hours, then try it on to check the fit.
- Repeat in small steps over several days rather than stretching to the target size in one sitting.
- Give the leather overnight rests between sessions so the fibres can settle before you stretch further.
If you don’t have a stretcher, a rounded form like a bowl covered in a soft cloth, with light padding built up gradually, can work in a pinch. Long-term pressure from a badly shaped form will crease the leather permanently, so this is a short-term fix at best.
Stop immediately if you notice tearing, a burning smell, or a crease that doesn’t relax after the leather cools. Those are signs the leather is under more stress than it can handle.
Can misting or steam help soften a stiff leather hat?
Yes, a small amount of moisture or brief steam can relax stiff leather fibres, but this only works safely in small doses. Over-wetting or applying direct heat risks shrinking or warping the leather, so treat this as a targeted fix, not a first resort.
Misting suits minor stiffness. A damp cloth works for slightly larger areas. Steam is for genuine shape correction, like flattening a stubborn crease in the brim.
- Spot test on a hidden part of the hat first, then wait a few hours to check for discolouration or texture change.
- For misting, use a light spray or a barely damp cloth over the stiff area, then wear the hat while it dries so it dries into your shape.
- For steam, hold the hat six to eight inches from the steam source and expose it briefly, rotating the hat so the heat spreads evenly rather than concentrating on one spot.
- Mould the damp area gently by hand, then let the hat air dry fully on a form before wearing it again.
Pro Tip: Never use a hairdryer to speed up drying. Fast heat pulls moisture out unevenly and is one of the quickest ways to warp a brim.
Avoid soaking the hat under a tap or leaving it under steam for more than a few seconds at a time. Both invite shrinkage that no amount of stretching will fully reverse.
Do leather hats need conditioning, and how often?
Conditioning helps when the leather feels dry, stiff, or shows fine surface cracking, particularly on older hats. A hat that’s already supple and holding its shape well doesn’t need it, and over-conditioning is a common way owners accidentally ruin a good fit.
- Cream conditioners offer a balanced approach, adding suppleness without heavily altering the leather’s structure.
- Wax balms boost water resistance, useful if you wear the hat outdoors often.
- Oils can work but need caution. They’re the most likely product type to darken leather or leave it limp.
Apply sparingly. Spot test on a hidden seam first, then rub a small amount in circular motions and let it absorb fully before wearing the hat briefly to check the result. Hat-specific conditioners tend to strike a better balance between suppleness and structure than general leather products built for boots or bags, which are often formulated for a different kind of flex.
How do you safely shape the brim and crown?
Shaping is best done slowly, with your hands and a supportive form, not tools that clamp or force the leather.
- Shape the brim by hand while it’s slightly warm or lightly misted, then rest it on a mould or a flat plate to hold the new curve.
- Leave the brim on the form for several hours. That resting period is what sets a gentle curve permanently, rather than springing back.
- Fix small dents in the crown with gentle, repeated pressure from inside, using a soft form for support as you push the leather back out.
- Skip clamps, stuffing the crown with newspaper for days, or bending the brim to an extreme angle. All three tend to leave permanent creases that no amount of later care will smooth out.
How do you stop a leather hat from losing its shape after break-in?
Once the fit is right, the goal shifts to protecting it. Damp weather, direct sun, and careless storage undo more good break-in work than most owners realise.
- Air-dry the hat after sweat or rain, away from direct heat, radiators, or full sun, which can dry the leather too fast and cause shrinkage.
- Store the hat on an adjustable stretcher or in a breathable box rather than stacking other items on top of it.
- Wipe the sweatband regularly and treat stains as they appear rather than letting them set in.
- Condition lightly and only when the leather starts to look dry. Seasonal touch-ups are usually enough for a hat in regular use.
What does Urban Caps recommend for a first-time break-in?
Our approach favours the same small-step routine covered throughout this guide: short wear cycles first, a stretcher second, and moisture or conditioner only as a last resort. Our own stretching guide walks through the stretcher method in more detail, and our cleaning guide covers spot testing before you apply any product.
The mistakes we see most often are all avoidable:
- Oversteaming a brim to fix one small crease, which often leaves the leather looking patchy or slightly warped instead. Fix it with a few seconds of steam at a time, checking the result before you continue.
- Over-oiling in an attempt to speed up softening, which usually darkens the leather and makes it go limp rather than supple. Fix it by switching to a lighter cream conditioner applied sparingly.
- Stuffing the crown with paper or cloth to reshape a dent, which can leave a permanent bulge if left too long. Fix it with short bursts of gentle hand pressure instead.
Every one of these mistakes comes from rushing a process that leather genuinely can’t be rushed through.
What matters most when you break in a leather hat?
The conventional advice on this topic leans too hard on dramatic fixes, soak it, steam it hard, force the shape by hand, when the leather itself responds better to almost nothing happening at all. Time and warmth do most of the real work. A stretcher and a little moisture are backup tools for the last stubborn bit of tightness, not the main event.
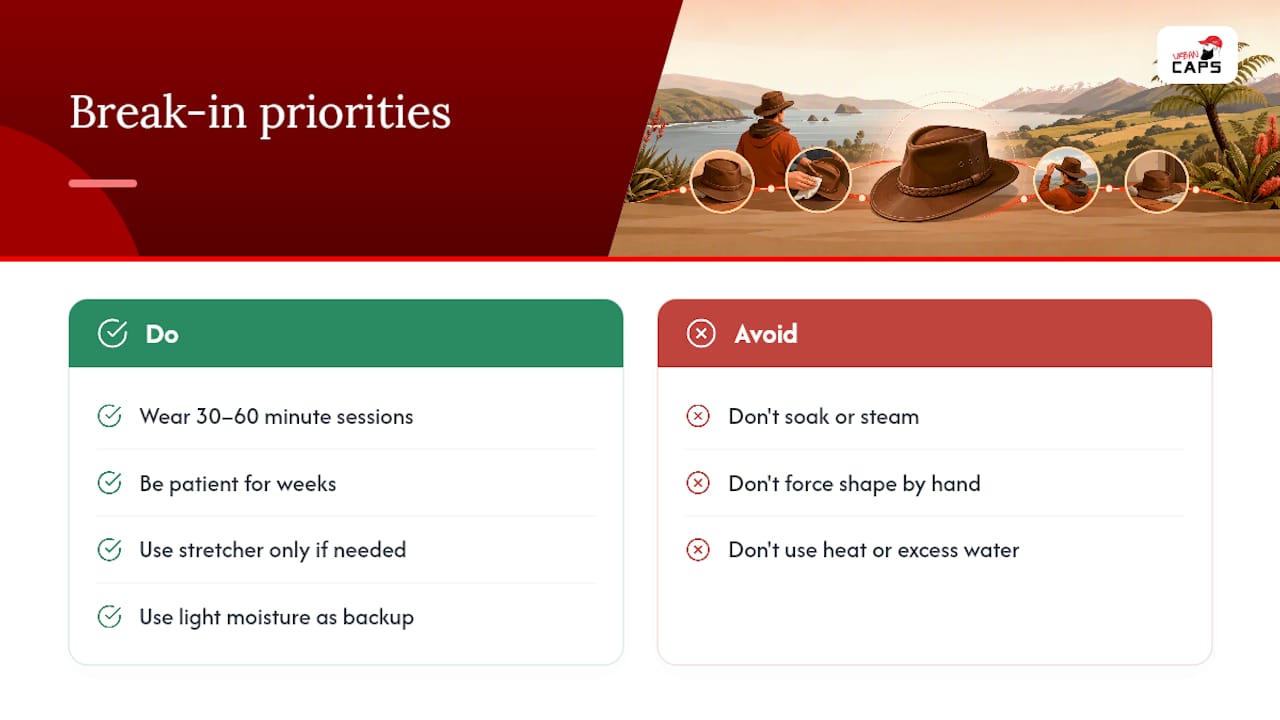
Where most guides get it wrong is treating every leather hat the same. A lightweight lambskin hat and a heavy cowhide fedora don’t soften on the same timeline, and expecting quick results from a thick full-grain hat leads people to reach for heat or excess water out of frustration. That’s when damage happens.
If there’s one thing to prioritise, it’s patience with the wearing routine before touching a stretcher or a spray bottle. Most fit problems solve themselves within a few weeks if you let the leather do what it’s built to do. The tools matter less than the order you reach for them in.
— Urban
Get the right hat and the right care gear from Urban Caps
This guide offers practical advice to help avoid guessing your way through a break-in with improper tools. We stock the leather caps and hats themselves, plus the fit and care resources to back them up, so you’re not left trying to soften a stiff brim with whatever’s in the kitchen cupboard.

If you’re still deciding on a style, our fedora hats and wool fedora hats both take well to the shaping techniques covered in this guide, and they’re built to reward a bit of patience during break-in. For fit issues on a hat you already own, check our size guide before reaching for a stretcher, and browse our leather caps and hats range if you’re after your next one. Got a specific fit problem? Get in touch with our team and we’ll point you towards the right stretcher or conditioner for your hat.
FAQ
Can you actually stretch a leather hat?
Yes. Leather responds well to gradual, controlled stretching, especially with an adjustable hat stretcher that expands the fit in small, even increments. Manual pulling by hand is far riskier and tends to leave uneven bulges instead of a clean, uniform fit.
How do you break in a new leather hat fast?
There’s no genuinely fast method that’s also safe. Short, repeated wear sessions of 30 to 60 minutes speed up the process without damaging the leather, and combining this with light hand shaping while the leather is warm gets you a noticeable change within the first few wears.
Can a leather hat be ruined if it gets wet?
Light moisture used deliberately, like a quick mist or a damp cloth, can actually help soften stiff leather. But heavy soaking or a proper drenching risks shrinkage, warping, or finish damage, particularly if the hat then dries near direct heat.
How long does it take for a leather hat to break in?
Most people notice a difference after three or four wears, with the bulk of the change settling in over two to three weeks. Lighter leathers like lambskin soften fastest, while heavier full-grain or cowhide hats can take a month or longer to fully relax.